Welcome back to our series on automating phishing investigation and response with playbooks in Smart SOAR. This is a four-part series covering preparation, wireframing, development, and testing. In this part, we’ll be designing our workflow, building on top of the integration commands prioritized in Part 1.
Wireframing workflows is an excellent step in-between preparation and development because it lets you validate the logic of the workflow alongside other stakeholders who may be a part of the process. For example, you may need to involve the firewall team, who do not have direct access to the SOAR platform to make a change to one of their filtering rules. In this case, you can build a communication and approval process into the workflow and make sure the data they’re receiving is what they need to make a decision quickly. This will save you time and makes building the logic of the playbook a faster, more collaborative process.
Playbook Structure
Before we start the wireframe, let’s talk about playbook structure. From our experience, there are four key stages to end-to-end playbooks: triage, enrichment, containment, and recovery.
The triage stage is where prioritization occurs. In Smart SOAR, we use event playbooks to assess the incoming alert and set an accurate severity for it so the incident response team can allocate their time accordingly.
The enrichment stage is where a lot of work gets automated. Rather than querying databases, reading through the results, and parsing it manually, the playbook should completely automate this stage with the end goal of displaying only the relevant information to the investigation team.
The containment stage is where Smart SOAR uses the various tools in our scenario to restrict the access of the adversary, limit possible damage to our assets, or prevent future disruptions. Actions taken in this stage can include resetting user passwords, deleting emails and files, blocking destination IP addresses, and more.
The recovery stage is where we can bring assets back online, whitelist IP addresses, and re-enable users if they have been temporarily deactivated. After each stage, a decision point is created so the investigation team can determine how they want to proceed and what actions to take.
Triage
As this is a phishing playbook we will also use the authentication results to set a severity level for this alert as it’s ingested. For this, we will build an event playbook that checks the authentication results and updates the severity to low, medium, high, or critical.
As a reminder, here are the authentication results from our sample alert:
"Authentication-Results": "spf=softfail (sender IP is 3.93.93.217) smtp.mailfrom=archiefilmco.com; dkim=fail (body hash did not verify) header.d=archiefilmco.com;dmarc=fail action=none header.from=archiefilmco.com;compauth=fail reason=001"
Our first step is to define each severity level in terms of the email’s authentication results:
- Critical: If multiple authentication methods fail, especially if DMARC fails with a policy suggesting rejection/quarantine.
- High: If DKIM and SPF fail, but DMARC policy is not set to reject/quarantine.
- Medium: If either SPF or DKIM fails, but not both.
- Low: If all authentication checks pass, or if there’s only a minor issue with one method.
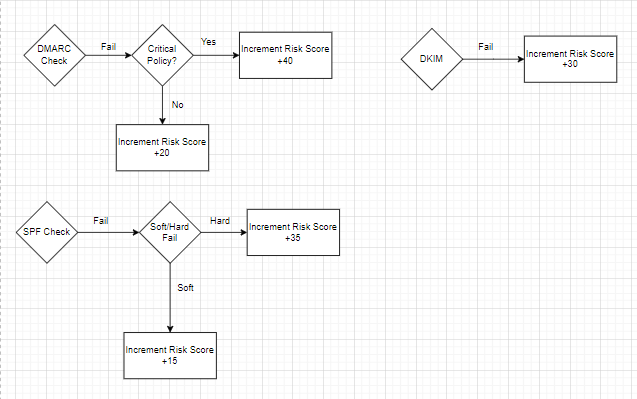
Using the various authentication results, we will adjust a risk score and use the final value to select the severity. Here is the criteria for the various authentication results along with the value ranges for each severity:
DMARC Results and Policy:
Fail with p=reject or p=quarantine policy: Add a high value (+40 points).
Fail with p=none policy: Add a moderate value (+20 points).
Pass: No change to the score.
DKIM Results:
Fail: Add a significant value (+30 points).
Pass: No change to the score.
SPF Criticality:
Fail (Hardfail): Add a significant value (+30 points).
Softfail: Add a moderate value (+15 points).
Neutral/None: Add a lower value (+10 points).
Pass: No change to the score.
Severity Risk Ranges
- Critical: 70 – 100 points
- High: 40 – 69 points
- Medium: 20 – 39 points
- Low: 0 – 19 points
The rough logic of the workflow would work as follows:
Enrichment
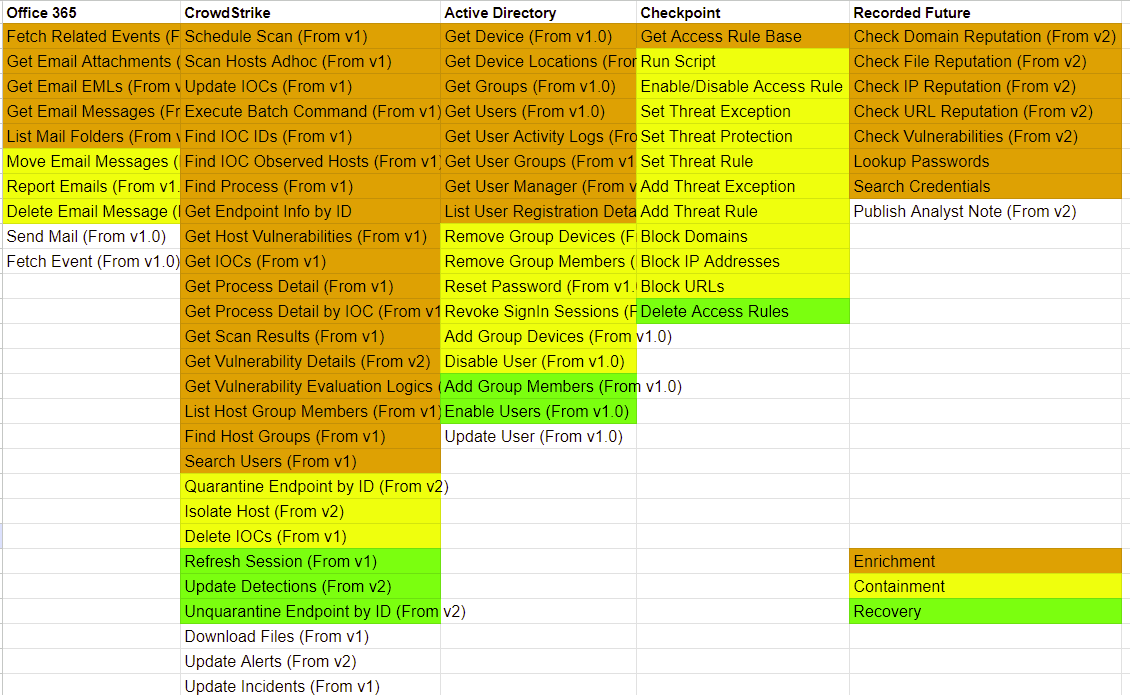
The work done in the preparation stage makes wireframing enrichment, containment, and recovery very straightforward. Across each type of task, we select the ones that we want for the workflow and connect them in the order they need to trigger. Remember, after going through the raw data of a sample alert, we found that the following artifacts will be relevant:
- Domain name
- Sender and recipient emails
- IP address
- URL
- Message ID
- File Hash
- Username
- Device ID
Integration Commands
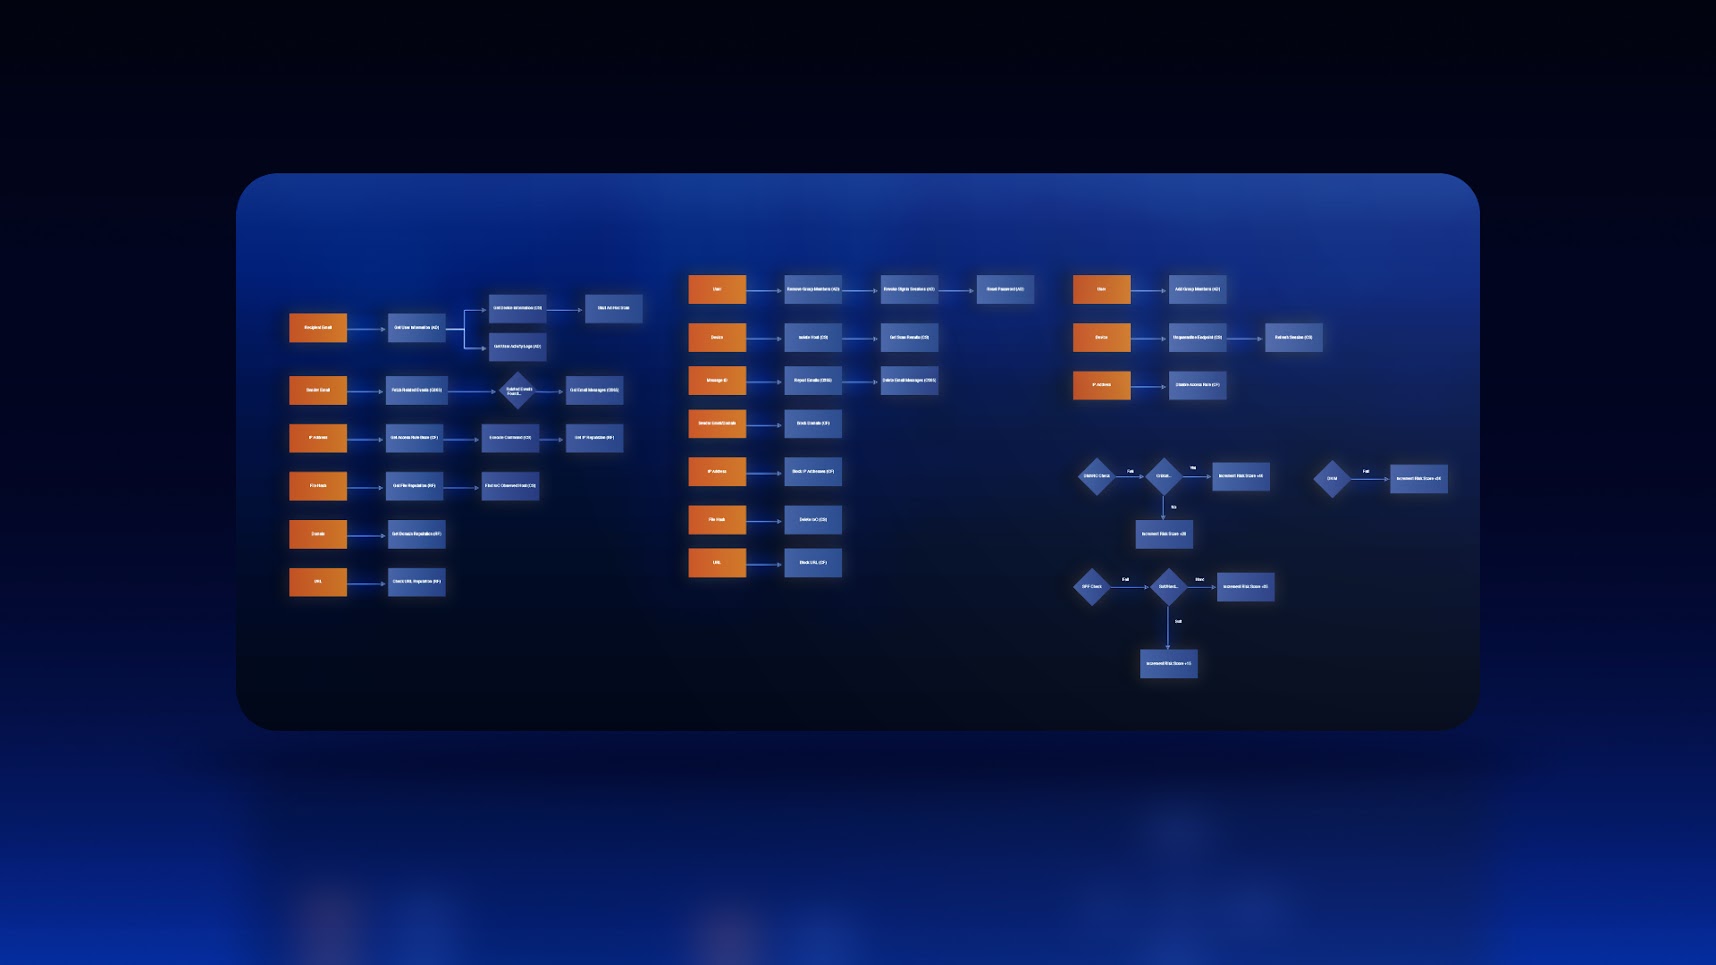
For these stages, we will break the workflow up into streams, one for each artifact. Then, we’ll check the integration commands for the ones relevant to each artifact and connect them in a logical way. Here is the design of our enrichment stage and a breakdown of each stream’s logic:
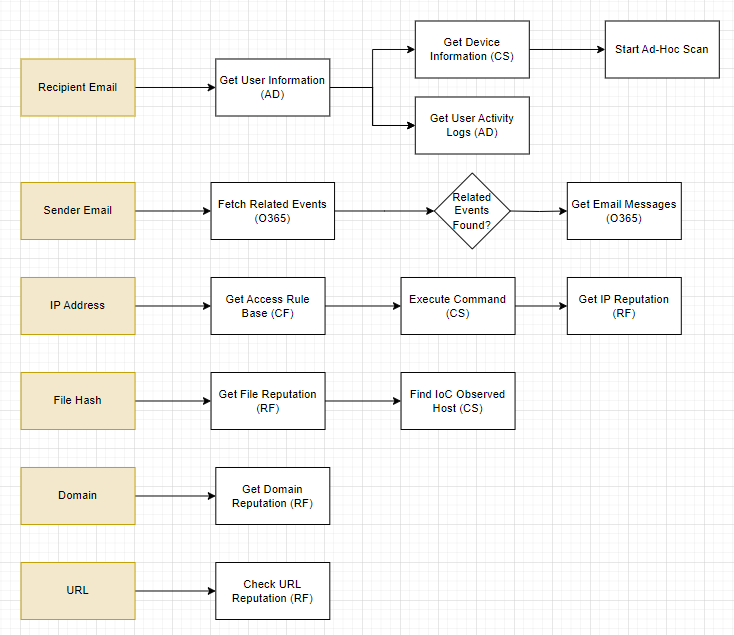
Recipient Email: With the recipient’s email, we want to get additional details on them from our IAM tool, Active Directory. This will include their enrolled groups, and devices. Once we have their username, we can collect their activity logs for a complete picture on this user. At the same time, we can collect device information from CrowdStrike and start an ad-hoc scan to review later.
Sender Email: Our goal with the sender email is to see if they are targeting any other members of our organization. In this stream, we are looking for any related emails to the one we are analyzing. If related emails are found, we will pull in details on those emails as well.
IP Address: The IP address of the sender is important information. We need to get our current access rules from Checkpoint Firewall to check against our requirements later. Then, we run a search on the affected endpoint with CrowdStrike to see all connections established with IP addresses outside of our network. Then, we take those IP addresses and run them through Recorded Future to assess the reliability of each device. Any high scores will be flagged and handled in the containment section.
File Hash: The file included in the email can be enriched with Recorded Future for open-source intelligence and also searched within CrowdStrike for any other devices that have downloaded the file. This will add devices to our containment and recovery targets in the future if we can confirm that the file is malicious.
Domain and URL: Both the domain of the sender and the URL are pushed through Recorded Future for open-source data. This will also return whois information for our records.
Containment
After the enrichment stage, a decision point is presented to the analyst. They use it to determine how they want to proceed: continue with containment or close the incident. If they decide to proceed with containment, they will also be prompted to select which actions they would like to take. Like the enrichment workflow, these actions are separated into streams, one for each artifact.
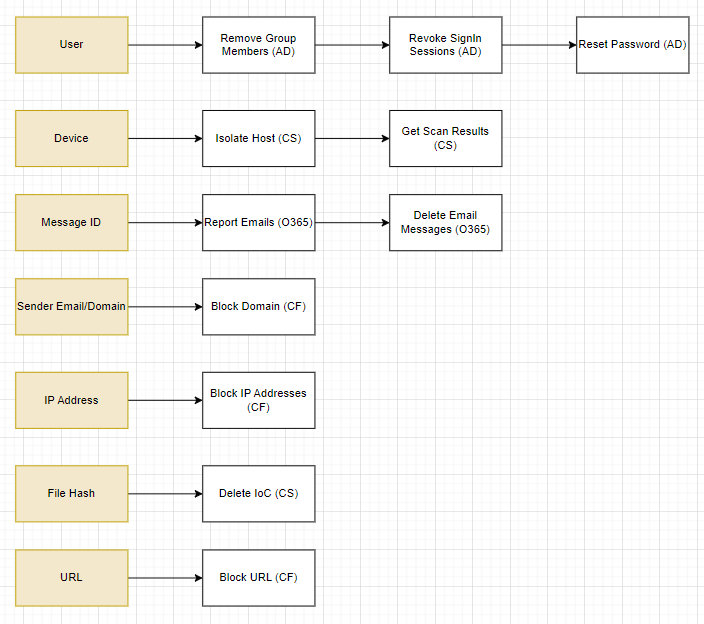
Containment Actions
User: Using Active Directory, Smart SOAR can remove the user from specific groups, revoke their sign-in sessions, and reset their password.
Device: CrowdStrike can be used to isolate the host and retrieve scan results.
Message ID: The original email and other email sent by the sender can be reported, and deleted from Office 365.
Sender Email/Domain: The domain can be blocked from our network using Checkpoint Firewall.
IP Address: The IP address can also be blocked with Checkpoint Firewall.
File Hash: Any instances of the file hash found on any device across our network can be deleted using CrowdStrike.
URL: Similar to the IP address and domain, Checkpoint Firewall can be leveraged to block access to the URL.
It is up to the analyst to decide which actions they would like to take. After these actions have been taken, a second decision point will be presented to them to proceed with recovery.
Recovery
Recovery is about resetting assets that have been taken offline or blocked during the containment stage. Here, we focus on three asset types: users, devices, and IP addresses.
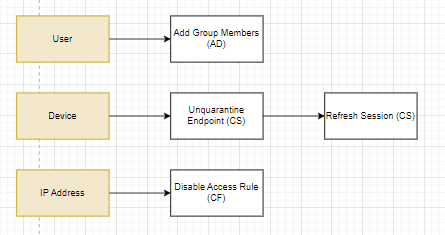
Recovery actions
User: The user can be re-added to groups after their password and sessions have been reset.
Device: Once suspicious connections and processes are terminated, and vulnerabilities have been patched, we can bring the device back online with CrowdStrike.
IP Address: Checkpoint Firewall can be used to re-enable access to the external IP address.
Closing Thoughts
Wireframing each stage lets us think through the logic and run it by teammates for approval and input. Once it’s solidified, we can proceed with development. In the next part of this series, we will start building the playbook in D3 Smart SOAR, including the event playbook for triage and the incident playbook for enrichment, containment, and recovery. Then we will proceed with testing and publish the playbook in part four. Thank you for reading through this guide on how to build a phishing playbook with Smart SOAR.
In This Series:
How to Build a Phishing Playbook Part 1: Preparation
How to Build a Phishing Playbook Part 3: Playbook Development
How to Build a Phishing Playbook Part 4: Testing and Publishing
